
Integrating with CI
Operating at scale is where ClusterRunner really shines, and with ClusterRunner in your testing pipeline you can start taking fast feedback for granted.
Follow the steps below and you’ll have a lovely Cluster of your own.
Overview
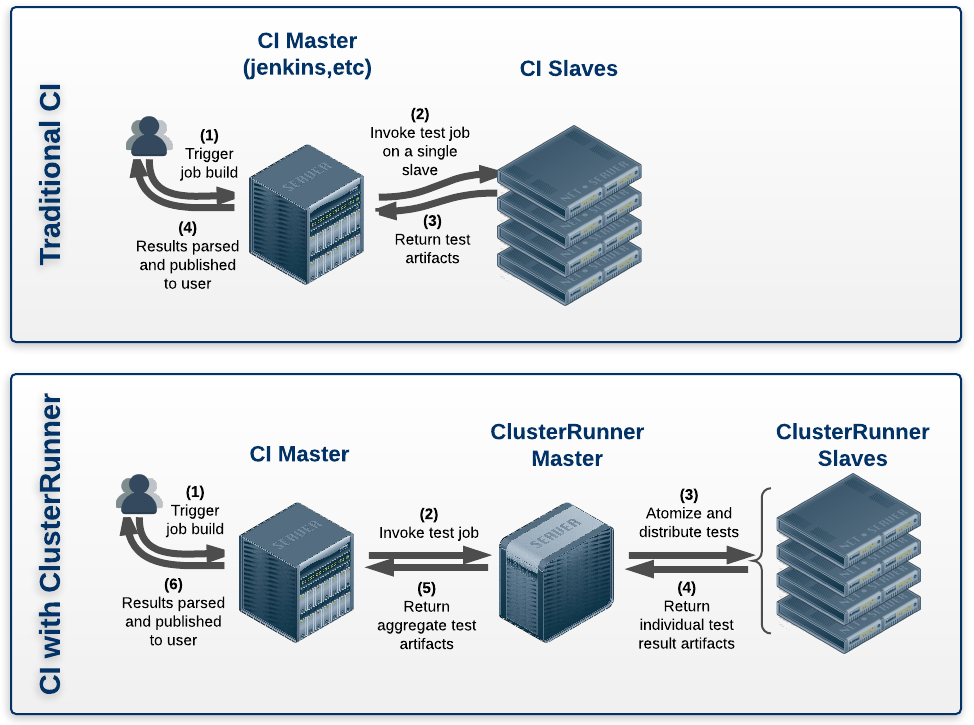
Simply put, ClusterRunner integrates with your existing infrastructure by transforming CI slaves into ClusterSlaves, and using the ClusterMaster as the entry-point for executing jobs.
From the users point of view, the CI systems behave exactly in the same way – just faster.
The change can be visualized in the following way:
Prerequisites
Before you can set up a distributed cluster, there are a few things you need to take care of first:
- Choose the hosts you’ll use as a ClusterMaster and ClusterSlaves
- Confirm SSH daemon running on all hosts in cluster
- Exchange SSH keys between master/slaves
- Exchange SSH keys with Git server
1. Take inventory of your CI executors
The first step when building out a Cluster is to know what machines you have available.
Take a bit of time to review your hosts, catalog their Operating Systems, and choose which one will be a ClusterMaster and which will be ClusterSlaves.
Master & Slave Operating Systems
At this time the master and slaves must all use the same type of operating system. We plan to add support for heterogeneous environments in the future.
2. Enable SSH access on hosts
OS X setup
To enable SSH on OS X, use these instructions.
Linux Setup
SSH access is enabled out-of-the-box for most Linux installs. If you find that it is not, please check the manual for your distro.
3. Exchange master/slave SSH keys
ClusterRunner relies on SSH to dynamically deploy and configure slaves. Password prompts will halt the process.
OS X and Linux
Set up passwordless SSH between your master and slaves.
It should take about a minute to manually exchange keys between the ClusterMaster and the first ClusterSlave (and faster for each subsequent slave). This is a one-time setup.
4. Exchange SSH keys with Git
ClusterSlaves fetch code from your repository – and ClusterRunner uses SSH as the primary Git communication protocol.
In order for ClusterRunner to operate smoothly, we strongly recommend you exchange SSH keys between your slaves and your Git server.
For any Git infrastructure, we recommend you generate a single private key (~/.ssh/id_rsa) on your master, and then push that file to all of your slaves.
GitHub
GitHub provides a comprehensive set of instructions for key exchange.
Self-hosted Git
Please refer to someone knowledgeable in the configuration of your Git service. Different Git services (git, gitolite, gitlab, etc.) handle user-key management in different ways, so we’re unable to provide guidance for this step.
Steps to Integrate ClusterRunner
1. Deploy and test the ClusterRunner service
To start your first distributed cluster, SSH to your ClusterMaster and run the commands below:
# Make sure you've done the "installation instructions" above

# Start the ClusterMaster process and specify the hostnames of your ClusterSlaves
~ $ clusterrunner deploy --slaves hostname1 hostname2 hostname3

# Run the tests for our "Simple job"
~ $ clusterrunner build git --url git@github.com:boxengservices/ClusterRunnerDemo.git --branch master --job-name Simple

# The exit code indicates success/failure!
Validate that the above “build” command was successful by checking the console output.
Now take a moment to celebrate that you have an fully-functioning distributed test cluster. Hooray.
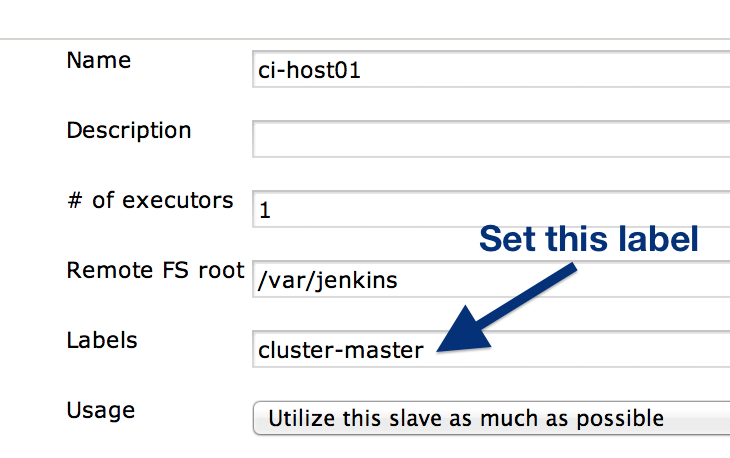
3. Label your ClusterMaster
Triggering ClusterRunner jobs is done via executing CLI commands on the ClusterMaster. In order to do that, you must identify the ClusterMaster in some way.
In Jenkins, this is done by editing the Node configuration as follows:
4. Modify your jobs to use ClusterRunner
Now that you have an operating Cluster in place, it’s time to reconfigure a CI job to leverage the resource.
4.1 Invoke ClusterRunner
Transitioning a CI job to use ClusterRunner is incredibly simple – and often only a single line of code in your CI job:
~ $ clusterunner build git --url <url to git repo> --branch <branch> --hash <hash> --job-name <job name>The “job name” represents any job you’ve defined in your project’s job configuration.
The “hash” is optional.
Performance Hint
If you use the "--url" argument, your CI system does not need to check out your repo's code into the build workspace. (The ClusterMaster will do this automatically.) This can save you seconds of execution time!
Don't forget to restrict this job to run only on CI nodes with the "cluster-master" label!
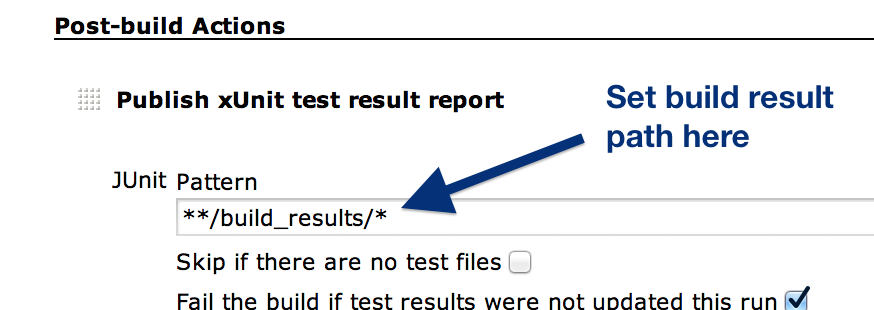
4.2 Publish build results in CI
Build results for any invocation of clusterrunner build are aggregated into the
./build_results/ directory.
To consume these results, simply configure your CI system to publish the appropriate pattern of results in that directory. In Jenkins, this looks like:
5. [optional] Unmount ClusterSlaves from your CI system
We recommend that you disconnect ClusterSlaves from your CI Master.
Since ClusterRunner wil be using these hosts to their full capacity, we recommend that you try to avoid running Jenkins jobs on them directly while they are operating as ClusterSlaves.
How we do it at Box: If you do choose to keep these mounted, we recommend adding a special label to them (such as “clusterslave”) so you can exclude them from other job definitions.
6. Profit!
Sit back and enjoy the effects of ClusterRunners’ capabilities.
As you increase your Cluster size and add more work to the system, you’ll be amazed at how efficiently ClusterRunner utilizes the resources you have available and provides faster test feedback.